A message from Jenny about the 'Circle of Friends' Square. Thank you!
I just read your blog post about the size of the "Circle of Friends" square... For some reason Blogger won't let me post a comment so I'm sending you this email to suggest using Priscilla Hewitt's "Antique Pearls Square" instead. It works out at about six inches square and is very similar to the "Circle of Friends".
Here is the link to the pdf file of the pattern:
http://priscillascrochet.net/free%20patterns/Afghan%20Squares/Antique%20Pearls%20Square.pdf
Thank you Jenny.

Thursday, 30 December 2010
Stephs version. 'Circle of Friends' Square.
I have had a play with the 8 inch pattern and have come up with the following pattern to make a 6 inch one (I have attached a photo for you)
Using DK acrylic yarn and 4mm hook (English terms):
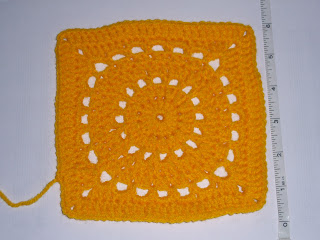
1. Make a magic circle. ch 3, 15 tr into circle and pull tight. sl st into top of 3 ch. (16 sts)
2. dc and tr into same st as sl st and each tr around, sl st into first dc (32 sts)
3. dc in same st as sl st, *ch 3, sk tr and dc into into next dc, repeat from * to end, sl st into first dc (16 3ch gaps)
4. sl st into first gap, ch 3, 2 tr in same gap, 3 tr in each gap around, sl st into top of 3 ch (48 sts)
5. dc in same st as sl st, *tr in next st, dc in next, repeat from * to end, sl st into first dc (48 sts)
6. dc in same st, *ch 3, sk tr and dc in next dc, repeat from * around, sl st into first dc (24 ch 3 gaps)
7. sl st into first gap, ch 3, 2 tr, ch 2, 3 tr in same gap. *3 htr in next gap, 3 dc in next 3 gaps, 3 htr in next gap, 3 tr, ch 2, 2 tr in next. Repeat from * around, sl st into top of 3 ch
8. ch 3, work 1 tr in each tr around and 2 tr, ch 2, 2 tr in each corner gap, sl st into top of 3 ch and fasten off thread.
Using DK acrylic yarn and 4mm hook (English terms):

Using DK acrylic yarn and 4mm hook (English terms):
1. Make a magic circle. ch 3, 15 tr into circle and pull tight. sl st into top of 3 ch. (16 sts)
2. dc and tr into same st as sl st and each tr around, sl st into first dc (32 sts)
3. dc in same st as sl st, *ch 3, sk tr and dc into into next dc, repeat from * to end, sl st into first dc (16 3ch gaps)
4. sl st into first gap, ch 3, 2 tr in same gap, 3 tr in each gap around, sl st into top of 3 ch (48 sts)
5. dc in same st as sl st, *tr in next st, dc in next, repeat from * to end, sl st into first dc (48 sts)
6. dc in same st, *ch 3, sk tr and dc in next dc, repeat from * around, sl st into first dc (24 ch 3 gaps)
7. sl st into first gap, ch 3, 2 tr, ch 2, 3 tr in same gap. *3 htr in next gap, 3 dc in next 3 gaps, 3 htr in next gap, 3 tr, ch 2, 2 tr in next. Repeat from * around, sl st into top of 3 ch
8. ch 3, work 1 tr in each tr around and 2 tr, ch 2, 2 tr in each corner gap, sl st into top of 3 ch and fasten off thread.
Wednesday, 29 December 2010
Sunburst Granny Square
Sunburst Granny Square
Ch 5; join with sl st to form ring.
Round 1: ch 3 to count as the first dc, work 15 more dc in the ring: joint with a sl st to the top of the beginning ch 3. (16 dc) Fasten off.
Round 2: Attach next color with a sl st in between any dc. ch1 (puff st in the same st and in each dc around. *ch 1 and puff st in between each dc. Repeat from * around. Join with a sl st to the first puff st. (16 puff sts) Fasten off.
Note: first puff st 5 loops instead of 7.
Puff stitch: (yo, insert hook in indicated st and pull up a long loop) 3 times, yo and pull through all 7 remaining loops on hook, ch 1 to lock.
Round 3: Attach next color with a sl st in the ch 1 sp between a puff st, ch 2, (cluster st, ch 2) in the same sp and in each ch 1 sp around; join with sl st to the beginning cluster st (16 cluster sts). Fasten off.
Cluster stitch: (yo, insert hook in indicated st and pull up a loop, yo and pull through 2 loops) 4 times, yo and pull through all 5 remaining loops on hook.
Note: first cluster stitch 4 loops instead of 5.
Round 4: Attach next color with a sl st in any ch 2 sp, ch 3 to count as the first dc, 2 dc in sp, (*3 hdc in the next ch 2 sp, 3 hdc in the next ch 2 sp, 3 hdc in the next ch 2 sp*,
{3 dc, ch 2, 3 dc} all in the next ch 2 sp for corner)
Repeat between ( )’s 2 times, then repeat from * to * once; 3 dc in the same sp as beginning dc, ch 2; join with a sl st to the top of the beginning ch 3. Fasten off.
Round 5: Attach next color with a sl st to any dc. Ch 3 then dc in each stitch around working 2 dc ch 2 2 dc in each corner. Join. Fasten off.
Terri has emailed me this pattern. I thought you'd be interested in the Square.
It is so .....pretty and I just love the colours she has chosen for it.
Thank you very much!
Enjoy!
Sunday, 26 December 2010
the square makeover
Hello, this is for those of us that want to do the friendship square.
The following adjustments were made to get it within the boundaries,: we are going to use a D hook instead of H, the circles are going to have 25 stitches instead of 30.
Follow the original pattern for how to do the circles and the joining/weaving of them --BEWARE # 4 is a pain to do --make sure you are going up when it says up and down where it says down otherwise it won't look like the picture. To save on frustration I pinned my circles together to stop them from shifting once they were completed that was a big help with getting # 4 where I needed it to go.
Leaving your circles pinned together (if you did) attach white w/sc, ch 3, skip next stitch, sc. your way around outside of the "square". join w/sl st to first sc. should look like pic below.

2nd rnd: sl st into first ch 3 sp, ch 5 dc ch 2 dc ch 2 dc in same space, *do "V" stitch in next 5 ch 3 sp's, then 3 "V"s in next ch 3 sp, repeat from * till back to beg ch 5, join w/sl to 3rd st of chain 5. should look like this:

Measure your square now. If you are at 5 1/2" or more then you need to SC the next rnd. if less then 5 1/2"
then do next rnd in HDC I cheat -- the brown thing under my square is a 6 x 6 square of cardboard, so I just lay may square on it so I know if I am within the 6" limit, makes less work for Sue.

any questions can be posted here , I will keep an eye out for them, Thanks Brenda (itty)
The following adjustments were made to get it within the boundaries,: we are going to use a D hook instead of H, the circles are going to have 25 stitches instead of 30.
Follow the original pattern for how to do the circles and the joining/weaving of them --BEWARE # 4 is a pain to do --make sure you are going up when it says up and down where it says down otherwise it won't look like the picture. To save on frustration I pinned my circles together to stop them from shifting once they were completed that was a big help with getting # 4 where I needed it to go.
Leaving your circles pinned together (if you did) attach white w/sc, ch 3, skip next stitch, sc. your way around outside of the "square". join w/sl st to first sc. should look like pic below.

2nd rnd: sl st into first ch 3 sp, ch 5 dc ch 2 dc ch 2 dc in same space, *do "V" stitch in next 5 ch 3 sp's, then 3 "V"s in next ch 3 sp, repeat from * till back to beg ch 5, join w/sl to 3rd st of chain 5. should look like this:

Measure your square now. If you are at 5 1/2" or more then you need to SC the next rnd. if less then 5 1/2"
then do next rnd in HDC I cheat -- the brown thing under my square is a 6 x 6 square of cardboard, so I just lay may square on it so I know if I am within the 6" limit, makes less work for Sue.
3rd rnd: sl st into first ch 2 sp: 3 sc(hdc), in corner ch 2 sp: 3 sc(hdc), ch 2, 3 sc(hdc) * 3 stiches in each ch 2 space to corner then it's: 3 sc(hdc), ch 2, 3 sc(hdc). Repeat around to beg. join with sl/st FO and weave in all ends.

any questions can be posted here , I will keep an eye out for them, Thanks Brenda (itty)
Saturday, 25 December 2010
squares beyond squares
The other two squares Sue received last week:
These are both squares from the book ‘Beyond the granny square’ by Edie Eckman. I have the book for a few months actually, but finally tried out a pattern. At first sight it seems quite complicated, but in practice they were quite easy to make.

This is motiv 105 on page 148.
I added a few extra rows, because otherwise the square would be too small for SIBOL-blankets.

And this is motiv 109 on page 152.
I like both squares a lot actually. Planning on another project I am afraid ...
Friday, 24 December 2010
2 squares
Two squares Sue received last week:
RicRac square
This is a square made in the ‘RicRac Motif’ by Sarah London.
You can buy the pattern over here: http://sarahlondon.wordpress.com/p-a-t-t-e-r-n-s/

star flower square
This is a square from the book by Jan Eaton (200 blocks to crochet): Star Flower, (square 71 on page 69)

RicRac square
This is a square made in the ‘RicRac Motif’ by Sarah London.
You can buy the pattern over here: http://sarahlondon.wordpress.com/p-a-t-t-e-r-n-s/

star flower square
This is a square from the book by Jan Eaton (200 blocks to crochet): Star Flower, (square 71 on page 69)

Friday, 26 November 2010
new popping flower Square
popping flower 6" square :)

This pattern uses the following stitches
sc, hdc, dc picot, popcorn
worked on a 4.5mm hook using us terminology :)
you can change the popcorn stitches to cluster stitches if easier the choice is your's :)
1, chain 4 and sl st to 1st ch to form ring
2, ch 3 and work 11 dc into ring
3, change colour if you wish, then ch 3 work 2 dc remove loop from hook insert into top of ch 3 insert hook through dropped loop and pull through loop on hook popcorn stitch made :) or linky note i am making a 3 st popcorn :)
then ch 3 and repat into each st around
4, change colour to background choice
ch 3 work 2 dc into direct ch space to the right * hdc x 3 into next st , hdc into next st dc x 3 ch 3 dc x 3 into next st (corner made) and repeat *
finish with 3 dc chain 3 and sl st into top of 1st ch 3 at beggining
5, ch 3 work 1 dc into same space then *ch 1 miss a stich 1 dc into next *repeat to corner workind 2 dc ch 3 2 dc in corner space repeat all around finishing with 2 dc ch 3 and sl st to top of ch 3 at beggining


6, ch 1 sc into same st then sc into each st x 7 working picot st(sc ch 3 sl st into same sc ) into next st work 8 sc to end working *sc picot sc into corner space , work 8 sc, picot, 8 sc ,*repeat to end sl st to first sc
7, change colour ch 3 into 1st st following a picot corner and work 1 dc into same st work 1 dc into each st till you reach the picot st from previous round and ch 1 at that point and continue working 1 dc into ach st to the last st where you will work 2 dc ch 3 2 dc for the corner repeat all around see pics
7, change colour ch 3 into 1st st following a picot corner and work 1 dc into same st work 1 dc into each st till you reach the picot st from previous round and ch 1 at that point and continue working 1 dc into ach st to the last st where you will work 2 dc ch 3 2 dc for the corner repeat all around see pics


8, change colour again if you wish work 5 sc into corner space and 1 sc all around joining with a sl st to 1st sc finish off
voila done made complete!!
Try different colourway's :0)
These will be en-route to Sue as soon as time allows xxx

have fun i hope i've made the pattern clear enough to understand however if you feel a few changes needs to be made in the writing of this pattern please contact me
The serious bit ~~ this pattern has been lovingly designed by me and must not be copied or changed without my prior consent anywhere, please link back to this page, if you wish to mention it anywhere and give credit, Exclusive design for Sibol xxxx Many thank's Amanda aka manda's challenges :) xxx
Subscribe to:
Posts (Atom)